

(作者:Angelvn大数据研发工作室)
- Flume概述
- Flume定义
Flume是Cloudera提供的一个高可用的、高可靠的、分布式的海量日志采集、聚合和传输的系统。Flume基于流式架构,灵活简单。

- Flume基础架构
Flume组成架构如下图所示。
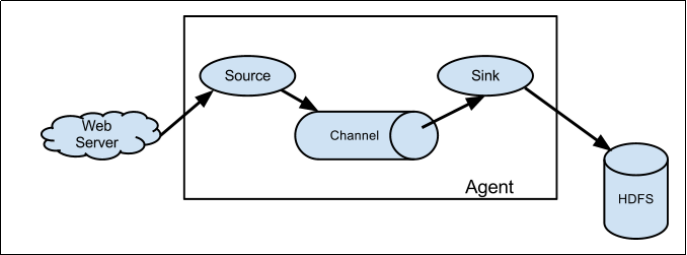
- Agent
Agent是一个JVM进程,它以事件的形式将数据从源头送至目的地。
Agent主要有3个部分组成,Source、Channel、Sink。
- Source
Source是负责接收数据到Flume Agent的组件。Source组件可以处理各种类型、各种格式的日志数据
- Sink
Sink不断地轮询Channel中的事件且批量地移除它们,并将这些事件批量写入到存储或索引系统、或者被发送到另一个Flume Agent。
- Channel
Channel是位于Source和Sink之间的缓冲区。因此,Channel允许Source和Sink运作在不同的速率上。Channel是线程安全的,可以同时处理几个Source的写入操作和几个Sink的读取操作。
Flume自带两种Channel:Memory Channel和File Channel。
Memory Channel是内存中的队列。Memory Channel在不需要关心数据丢失的情景下适用。如果需要关心数据丢失,那么Memory Channel就不应该使用,因为程序死亡、机器宕机或者重启都会导致数据丢失。
File Channel将所有事件写到磁盘。因此在程序关闭或机器宕机的情况下不会丢失数据。
- Event
传输单元,Flume数据传输的基本单元,以Event的形式将数据从源头送至目的地。Event由Header和Body两部分组成,Header用来存放该event的一些属性,为K-V结构,Body用来存放该条数据,形式为字节数组。

- Flume入门
- Flume安装部署
- 安装地址Flume官网地址:http://flume.apache.org/文档查看地址:http://flume.apache.org/FlumeUserGuide.html下载地址:http://archive.apache.org/dist/flume/
- 安装部署将apache-flume-1.10.1-bin.tar.gz上传到linux的/opt/software目录下。解压apache-flume-1.10.1-bin.tar.gz到/opt/module/目录下。
- Flume安装部署
[Angelvn@hadoop102 software]$ tar -zxvf /opt/software/apache-flume-1.10.1-bin.tar.gz -C /opt/module/- 修改apache-flume-1.10.1-bin的名称为flume。
[Angelvn@hadoop102 module]$ mv /opt/module/apache-flume-1.10.1-bin /opt/module/flume-1.10.1- 修改conf下的log4j2.xml确定日志打印的位置,在53行 21行后插入。
53       <AppenderRef ref="LogFile" />

54       <AppenderRef ref="Console" />

21 <Property name="LOG_DIR">/opt/module/flume-1.10.1/logs</Property>- Flume入门案例监控端口数据官方案例案例需求:
使用Flume监听一个端口,收集该端口数据,并打印到控制台。
- 实现步骤:安装netcat工具。
[Angelvn@hadoop102 software]$ sudo yum install -y nc- 判断44444端口是否被占用。
[Angelvn@hadoop102 flume]$ sudo netstat -nlp | grep 44444- 在conf文件夹下创建Flume Agent配置文件nc-flume-log.conf。
[Angelvn@hadoop102 conf]$ vim nc-flume-log.conf- 在nc-flume-log.conf文件中添加如下内容。
添加内容如下:
# Name the components on this agent

a1.sources = r1

a1.sinks = k1

a1.channels = c1

# Describe/configure the source

a1.sources.r1.type = netcat

a1.sources.r1.bind = localhost

a1.sources.r1.port = 44444

# Describe the sink

a1.sinks.k1.type = logger

# Use a channel which buffers events in memory

a1.channels.c1.type = memory

a1.channels.c1.capacity = 1000

a1.channels.c1.transactionCapacity = 100

# Bind the source and sink to the channel

a1.sources.r1.channels = c1

a1.sinks.k1.channel = c1注:配置文件来源于官方手册http://flume.apache.org/FlumeUserGuide.html
- 先开启flume监听端口。
第一种写法:
[Angelvn@hadoop102 flume]$ bin/flume-ng agent --conf conf/ --name a1 --conf-file conf/nc-flume-log.conf -Dflume.root.logger=INFO,console第二种写法:
[Angelvn@hadoop102 flume]$ bin/flume-ng agent -c conf/ -n a1 -f conf/nc-flume-log.conf -Dflume.root.logger=INFO,console参数说明:
- --conf/-c:表示配置文件存储在conf/目录
- --name/-n:表示给agent起名为a1
- --conf-file/-f:flume本次启动读取的配置文件是在conf文件夹下的nc-flume-log.conf文件。
- -Dflume.root.logger=INFO,console :-D表示flume运行时动态修改flume.root.logger参数属性值,并将控制台日志打印级别设置为INFO级别。日志级别包括:log、info、warn、error。日志参数已经在配置文件中修改了,不再需要重复输入。
- 使用netcat工具向本机的44444端口发送内容。
[Angelvn@hadoop102 ~]$ nc localhost 44444

hello

Angelvn

10- 在Flume监听页面观察接收数据情况。
2021-07-15 13:51:00,236 (SinkRunner-PollingRunner-DefaultSinkProcessor) [INFO - org.apache.flume.sink.LoggerSink.process(LoggerSink.java:95)] Event: { headers:{} body: 31 30 10 }- event打印的源码介绍。
LoggerSink的process方法:
if (event != null) {

    if (logger.isInfoEnabled()) {

        logger.info("Event: " + EventHelper.dumpEvent(event, maxBytesToLog));

    }

}
dumpEvent方法返回值:buffer是固定长度的字符串,前端是16进制表示的字符的阿斯卡码值。
return "{ headers:" + event.getHeaders() + " body:" + buffer + " }";- 实时监控目录下的多个追加文件
Taildir Source适合用于监听多个实时追加的文件,并且能够实现断点续传。
- 案例需求:使用Flume监听整个目录的实时追加文件,并上传至HDFS 需求分析
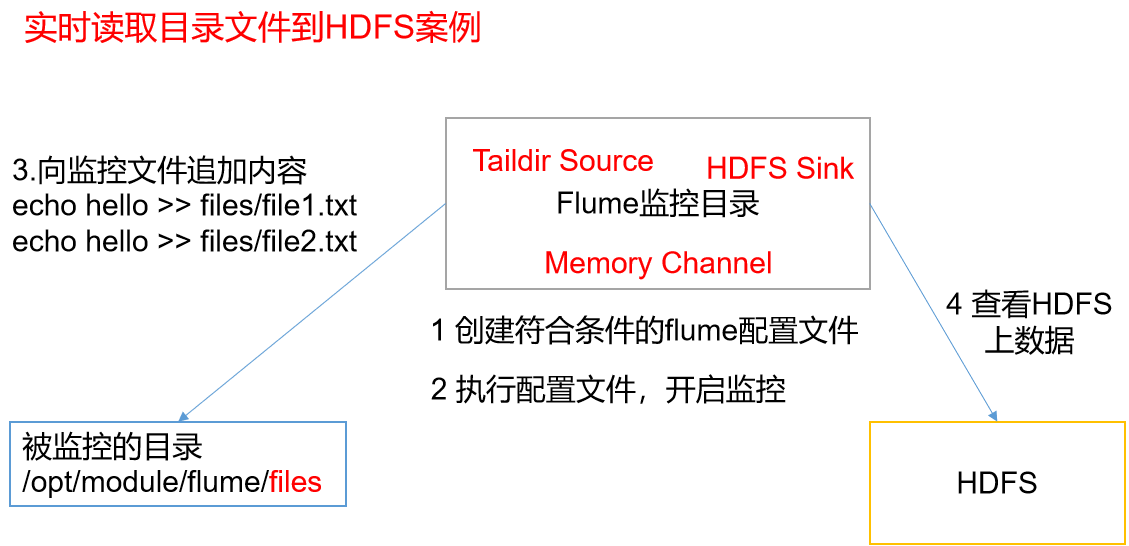
- 实现步骤在conf目录下创建配置文件taildir-flume-hdfs.conf。
① 创建一个文件。
[Angelvn@hadoop102 conf]$ vim taildir-flume-hdfs.conf② 添加如下内容。
a1.sources = r1

a1.sinks = k1

a1.channels = c1

# Describe/configure the source

a1.sources.r1.type = TAILDIR

a1.sources.r1.filegroups = f1 f2

# 必须精确到文件,可以写匹配表达式匹配多个文件

a1.sources.r1.filegroups.f1 = /opt/module/flume/files1/.*file.*

a1.sources.r1.filegroups.f2 = /opt/module/flume/files2/.*log.*

# 实现断点续传的文件存放位置 不改有默认位置也能实现断点续传

a1.sources.r1.positionFile = /opt/module/flume/taildir_position.json

# Describe the sink

a1.sinks.k1.type = hdfs

# 地址值可以填写hdfs://hadoop102:8020也可以省略,flume会自动读取hadoop配置文件信息获取地址

a1.sinks.k1.hdfs.path = hdfs://hadoop102:8020/flume/%Y%m%d/%H

#上传文件的前缀

a1.sinks.k1.hdfs.filePrefix = log-

#是否使用本地时间戳

a1.sinks.k1.hdfs.useLocalTimeStamp = true

#设置文件类型 分为二进制文件SequenceFile和文本文件DataStream(不能压缩) 和CompressedStream(可以压缩)

a1.sinks.k1.hdfs.fileType = DataStream

#多久生成一个新的文件

a1.sinks.k1.hdfs.rollInterval = 30

#设置每个文件的滚动大小大概是128M

a1.sinks.k1.hdfs.rollSize = 134217700

#文件的滚动与Event数量无关

a1.sinks.k1.hdfs.rollCount = 0

# Use a channel which buffers events in memory

a1.channels.c1.type = memory

a1.channels.c1.capacity = 1000

a1.channels.c1.transactionCapacity = 100

# Bind the source and sink to the channel

a1.sources.r1.channels = c1

a1.sinks.k1.channel = c1- 向files文件夹中追加内容。
在/opt/module/flume目录下创建files1文件夹。
[Angelvn@hadoop102 flume]$ mkdir files1

[Angelvn@hadoop102 flume]$ mkdir files2- 启动监控文件夹命令。
[Angelvn@hadoop102 flume]$ bin/flume-ng agent --conf conf/ --name a1 --conf-file conf/taildir-flume-hdfs.conf向upload文件夹中添加文件。
[Angelvn@hadoop102 files1]$ echo hello >> file1.txt

[Angelvn@hadoop102 files1]$ echo Angelvn >> file2.txt- 查看HDFS上的数据
Taildir说明:
Taildir Source维护了一个JSON格式的position File,其会定期的往position File中更新每个文件读取到的最新的位置,因此能够实现断点续传。Position File的格式如下:
{"inode":2496272,"pos":12,"file":"/opt/module/flume/files1/file1.txt"}

{"inode":2496275,"pos":12,"file":"/opt/module/flume/files1/file2.txt"}
注:Linux中储存文件元数据的区域就叫做inode,每个inode都有一个号码,操作系统用inode号码来识别不同的文件,Unix/Linux系统内部不使用文件名,而使用inode号码来识别文件。TailDir source使用inode和文件的全路径一起识别同一个文件,所以修改文件名之后如果表达式也能够匹配上,会再重新读取一份文件的数据。
- Flume进阶
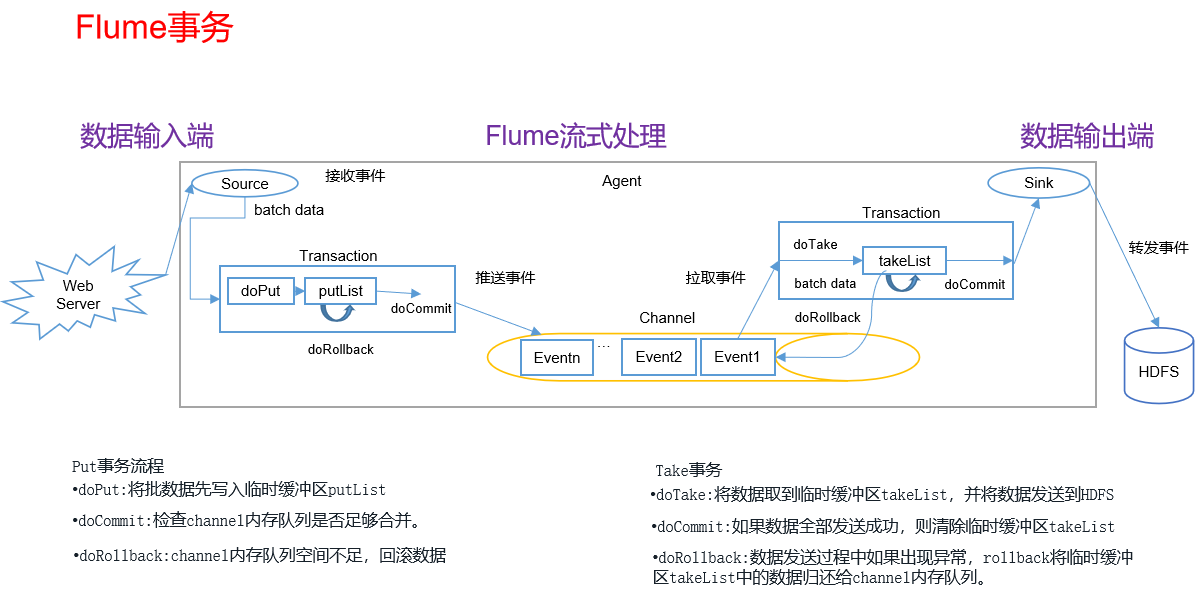
- Flume事务
- Flume Agent内部原理
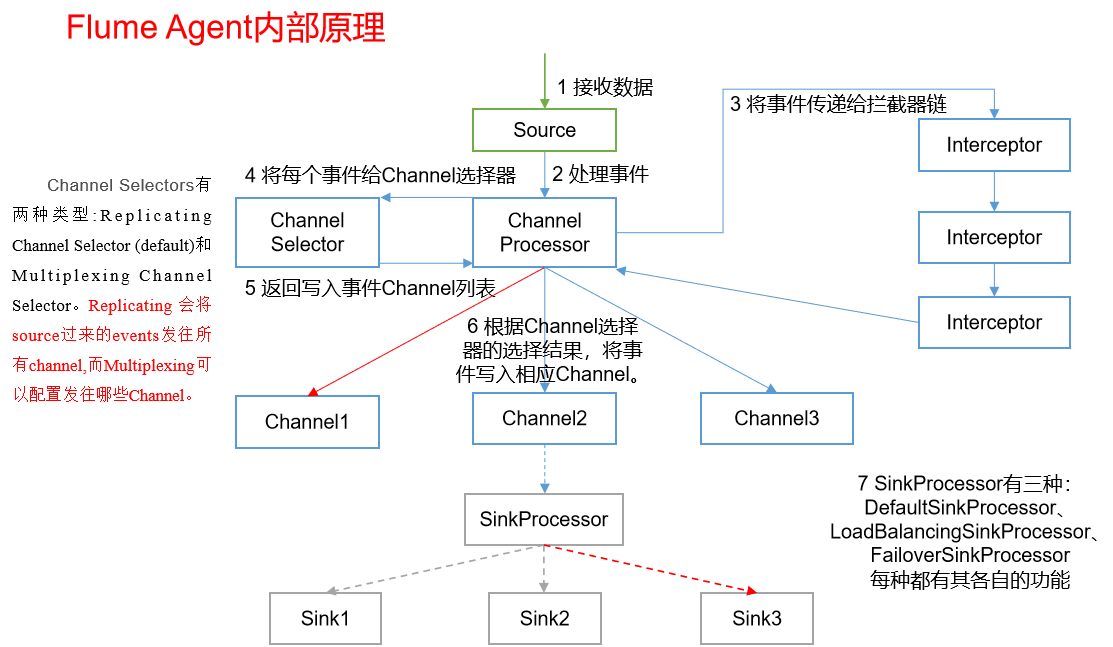
组件介绍:
- ChannelSelector
ChannelSelector的作用就是选出Event将要被发往哪个Channel。其共有两种类型,分别是Replicating(复制)和Multiplexing(多路复用)。
ReplicatingSelector会将同一个Event发往所有的Channel,Multiplexing会根据相应的原则,将不同的Event发往不同的Channel。
- SinkProcessor
SinkProcessor共有三种类型,分别是DefaultSinkProcessor(默认1对1)、LoadBalancingSinkProcessor(负载均衡)和FailoverSinkProcessor(故障转移)
DefaultSinkProcessor对应的是单个的Sink,LoadBalancingSinkProcessor和FailoverSinkProcessor对应的是Sink Group,LoadBalancingSinkProcessor可以实现负载均衡的功能,FailoverSinkProcessor可以错误恢复的功能。
- Flume企业开发案例复制案例案例需求
使用Flume-1监控文件变动,Flume-1将变动内容传递给Flume-2,Flume-2负责存储到HDFS。同时Flume-1将变动内容传递给Flume-3,Flume-3负责输出到Local FileSystem。
- 需求分析
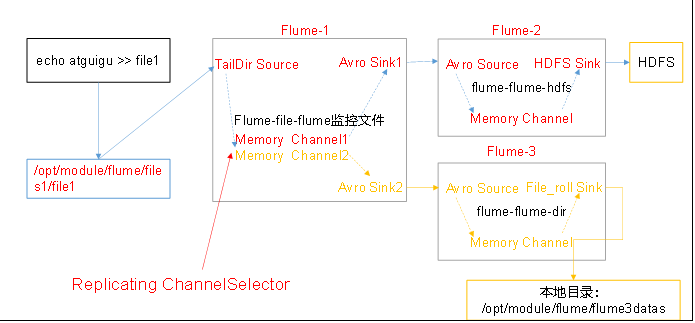
- 实现步骤准备工作。
在/opt/module/flume/conf目录下创建group1文件夹。
[Angelvn@hadoop102 conf]$ mkdir group1/在/opt/module/flume/目录下创建flume3datas文件夹。
[Angelvn@hadoop102 flume]$ mkdir flume3 datas- 创建flume1.conf。
配置1个接收日志文件的source和两个channel、两个sink,分别输送给flume2和flume3。
① 编辑配置文件。
[Angelvn@hadoop102 group1]$ vim flume1.conf② 添加如下内容。
# Name the components on this agent

a1.sources = r1

a1.sinks = k1 k2

a1.channels = c1 c2

# Describe/configure the source

a1.sources.r1.type = TAILDIR

a1.sources.r1.filegroups = f1 f2

a1.sources.r1.filegroups.f1 = /opt/module/flume/files1/.*file.*

a1.sources.r1.filegroups.f2 = /opt/module/flume/files2/.*log.*

a1.sources.r1.positionFile = /opt/module/flume/taildir_position.json

# 将数据流复制给所有channel 默认参数可以不写

a1.sources.r1.selector.type = replicating

# Describe the sink

# sink端的avro是一个数据发送者

a1.sinks.k1.type = avro

a1.sinks.k1.hostname = hadoop102

a1.sinks.k1.port = 4141

a1.sinks.k2.type = avro

a1.sinks.k2.hostname = hadoop102

a1.sinks.k2.port = 4142

# Describe the channel

a1.channels.c1.type = memory

a1.channels.c1.capacity = 1000

a1.channels.c1.transactionCapacity = 100

a1.channels.c2.type = memory

a1.channels.c2.capacity = 1000

a1.channels.c2.transactionCapacity = 100

# Bind the source and sink to the channel

a1.sources.r1.channels = c1 c2

a1.sinks.k1.channel = c1

a1.sinks.k2.channel = c2- 创建flume2.conf。
配置上级Flume输出的Source,输出是到HDFS的Sink。
①编辑配置文件。
[Angelvn@hadoop102 group1]$ vim flume2.conf②添加如下内容。
# Name the components on this agent

a1.sources = r1

a1.sinks = k1

a1.channels = c1

# Describe/configure the source

a1.sources.r1.type = avro

a1.sources.r1.bind = hadoop102

a1.sources.r1.port = 4141

# Describe the sink

a1.sinks.k1.type = hdfs

a1.sinks.k1.hdfs.path = hdfs://hadoop102:8020/flume1/%Y%m%d/%H

# 文件的前缀

a1.sinks.k1.hdfs.filePrefix = log-

#多久生成一个新的文件

a1.sinks.k1.hdfs.rollInterval = 30

#设置每个文件的滚动大小大概是128M

a1.sinks.k1.hdfs.rollSize = 134217700

#文件的滚动与Event数量无关

a1.sinks.k1.hdfs.rollCount = 0

# 使用本地的时间戳

a1.sinks.k1.hdfs.useLocalTimeStamp = true

#设置文件类型 分为二进制文件SequenceFile和文本文件DataStream(不能压缩) 和CompressedStream(可以压缩)

a1.sinks.k1.hdfs.fileType = DataStream

# Use a channel which buffers events in memory

a1.channels.c1.type = memory

a1.channels.c1.capacity = 1000

a1.channels.c1.transactionCapacity = 100

# Bind the source and sink to the channel

a1.sources.r1.channels = c1

a1.sinks.k1.channel = c1- 创建flume3.conf。
配置上级Flume输出的Source,输出是到本地目录的Sink。
① 编辑配置文件。
[Angelvn@hadoop102 group1]$ vim flume3.conf② 添加如下内容。
# Name the components on this agent

a1.sources = r1

a1.sinks = k1

a1.channels = c1

# Describe/configure the source

a1.sources.r1.type = avro

a1.sources.r1.bind = hadoop102

a1.sources.r1.port = 4142

# Describe the sink

a1.sinks.k1.type = file_roll

a1.sinks.k1.sink.directory = /opt/module/flume/flume3datas

# Use a channel which buffers events in memory

a1.channels.c1.type = memory

a1.channels.c1.capacity = 1000

a1.channels.c1.transactionCapacity = 100

# Bind the source and sink to the channel

a1.sources.r1.channels = c1

a1.sinks.k1.channel = c1提示:输出的本地目录必须是已经存在的目录,如果该目录不存在,并不会创建新的目录。
- 启动Hadoop。
[Angelvn@hadoop102 hadoop-3.3.4]$ sbin/start-dfs.sh

[Angelvn@hadoop103 hadoop-3.3.4]$ sbin/start-yarn.sh- 执行配置文件。
分别启动对应的flume进程:flume1、flume2、flume3。
[Angelvn@hadoop102 flume]$ bin/flume-ng agent --conf conf/ --name a1 --conf-file conf/group1/flume3.conf

[Angelvn@hadoop102 flume]$ bin/flume-ng agent --conf conf/ --name a1 --conf-file conf/group1/flume2.conf

[Angelvn@hadoop102 flume]$ bin/flume-ng agent --conf conf/ --name a1 --conf-file conf/group1/flume1.conf- 向监控的文件传入数据
[Angelvn@hadoop102 files1]$ echo hello >> file1.txt- 检查HDFS上数据
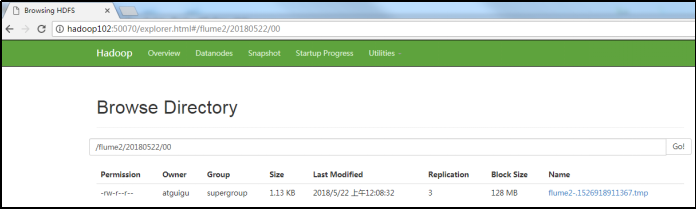
- 检查/opt/module/datas/flume3目录中数据
[Angelvn@hadoop102 flume3]$ ll

总用量 8

-rw-rw-r--. 1 Angelvn Angelvn 5942 5月 22 00:09 1526918887550-3- 多路复用及拦截器案例案例需求
使用Flume采集服务器本地日志,需要按照日志类型的不同,将不同种类的日志发往不同的分析系统。
- 需求分析
在实际的开发中,一台服务器产生的日志类型可能有很多种,不同类型的日志可能需要发送到不同的分析系统。此时会用到Flume的channel selecter中的Multiplexing结构,Multiplexing的原理是,根据event中Header的某个key的值,将不同的event发送到不同的Channel中,所以我们需要自定义一个Interceptor,为不同类型的event的Header中的key赋予不同的值。
在该案例中,我们以端口数据模拟日志,以数字(单个)和字母(单个)模拟不同类型的日志,我们需要自定义interceptor区分数字和字母,将其分别发往不同的分析系统(Channel)。

- 实现步骤创建一个maven项目,并引入以下依赖。
<dependencies>

<dependency>

<groupId>org.apache.flume</groupId>

<artifactId>flume-ng-core</artifactId>

<version>1.10.1</version>

</dependency>

</dependencies>- 定义CustomInterceptor类并实现Interceptor接口。
package com.Angelvn.flume;

import org.apache.flume.Context;

import org.apache.flume.Event;

import org.apache.flume.interceptor.Interceptor;

import java.util.List;

import java.util.Map;

/**

* 1. 实现interceptor接口

 * 2. 实现接口的4个方法

 * 3. 实现一个静态内部类创建拦截器

 */

public class MyInterceptor implements Interceptor {

    /**

     * 初始化方法

     */

    @Override

    public void initialize() {

    }

    /**

     * 处理单条event

     * @param event

     * @return

     */

    @Override

    public Event intercept(Event event) {

        // 需要配合channel选择器使用  向headers当中put对应的参数

        // 根据传入的数据 首位是数字还是字母  判断他是不同类型的日志

        byte[] body = event.getBody();

        byte b = body[0];

        Map<String, String> headers = event.getHeaders();

        if (b >= '0' && b <= '9'){

            // b为数字

            headers.put("type","number");

        }else if((b >= 'a' && b <= 'z') || (b >= 'A' && b <= 'Z')){

            // b 为字母

            headers.put("type","letter");

        }

        // 可以不需要在写放回headers

        event.setHeaders(headers);

        return event;

    }

    /**

     * 处理多条event

     * @param events

     * @return

     */

    @Override

    public List<Event> intercept(List<Event> events) {

        for (Event event : events) {

            intercept(event);

        }

        return events;

    }

    @Override

    public void close() {

    }

    // 静态内部类

    public static class MyBuilder implements Builder{

        /**

         * 创建拦截器

         * @return

         */

        @Override

        public Interceptor build() {

            return new MyInterceptor();

        }

        @Override

        public void configure(Context context) {

        }

    }

}- 编辑flume配置文件
创建新文件conf/group2/flume1,创建新文件conf/group2/flume2,创建新文件conf/group2/flume3。
为Flume1配置1个netcat source,1个sink group(2个avro sink),并配置相应的ChannelSelector和interceptor。
# Name the components on this agent

a1.sources = r1

a1.sinks = k1 k2

a1.channels = c1 c2

# Describe/configure the source

a1.sources.r1.type = netcat

a1.sources.r1.bind = localhost

a1.sources.r1.port = 44444

a1.sources.r1.selector.type = multiplexing

# 使用headers中的哪些参数

a1.sources.r1.selector.header = type

a1.sources.r1.selector.mapping.number = c1

a1.sources.r1.selector.mapping.letter = c2

# a1.sources.r1.selector.default = c4

# 拦截器配置

a1.sources.r1.interceptors = i1

a1.sources.r1.interceptors.i1.type = com.Angelvn.flume.MyInterceptor$MyBuilder

# Describe the sink

a1.sinks.k1.type = avro

a1.sinks.k1.hostname = hadoop102

a1.sinks.k1.port = 4141

a1.sinks.k2.type = avro

a1.sinks.k2.hostname = hadoop102

a1.sinks.k2.port = 4142

# Use a channel which buffers events in memory

a1.channels.c1.type = memory

a1.channels.c1.capacity = 1000

a1.channels.c1.transactionCapacity = 100

a1.channels.c2.type = memory

a1.channels.c2.capacity = 1000

a1.channels.c2.transactionCapacity = 100

# Bind the source and sink to the channel

a1.sources.r1.channels = c1 c2

a1.sinks.k1.channel = c1

a1.sinks.k2.channel = c2
为Flume2配置一个avro source和一个logger sink。
a1.sources = r1

a1.sinks = k1

a1.channels = c1

a1.sources.r1.type = avro

a1.sources.r1.bind = hadoop102

a1.sources.r1.port = 4141

a1.sinks.k1.type = logger

a1.channels.c1.type = memory

a1.channels.c1.capacity = 1000

a1.channels.c1.transactionCapacity = 100

a1.sinks.k1.channel = c1

a1.sources.r1.channels = c1
为Flume3配置一个avro source和一个logger sink。
a1.sources = r1

a1.sinks = k1

a1.channels = c1

a1.sources.r1.type = avro

a1.sources.r1.bind = hadoop102

a1.sources.r1.port = 4142

a1.sinks.k1.type = logger

a1.channels.c1.type = memory

a1.channels.c1.capacity = 1000

a1.channels.c1.transactionCapacity = 100

a1.sinks.k1.channel = c1

a1.sources.r1.channels = c1- 分别启动flume1,flume2和flume3。
- 在hadoop102使用netcat向localhost:44444发送字母和数字。
- 观察flume2和flume3打印的日志。
- 在hadoop102使用netcat向localhost:44444发送字母和数字。

评论